Friday, January 28, 2011

Staples are us

Great cookery is an act of creation, a deliberate acceptance of dealing with what you have, rather than what you wish you cant. Most of the world's fancy dishes were once the purview of the poor and downtrodden, those who couldn't afford even common fare and had to improvise with whatever they had on hand.

Not so long ago, most people could and did plant a garden, not for looks but for sustenance. A spot of dirt was cleared out beneath the home and a root cellar was set up to keep those things that could survive the long winters, with some preserved pieces of meat, often pork, kept at hand for that extra protein kick.

Nowadays, we have access to canned goods, which serve the same purpose. Some are out-of-the-can meals, like soups and stews, while other are more basic fares. Today, I will demonstrate that a delicious meal can be made with a few cans and a handful of basic staples that should be part of every larder.

This a preparation that is low on preparation and high in taste, with minimal supplies needed. You'll need a can of white kidney beans, drained and rinsed; a potato or two, diced; a tomato, in chunks; an onion, halved and sliced; and as much garlic as you desire, crushed and chopped. In my experience, you'll want to add some sort of fat to this, and my preference is for pork of some sort: salted belly, some diced bacon, a sausage cut in pieces. Plain beans are greatly enhanced with the addition of animal fat, which is why most traditional bean dishes call for the addition of diced salted belly.

Start by browning the meat (if you're using some; otherwise, just use a good amount of oil) in a pan that will hold all the ingredients on medium-low heat. When enough fat has been rendered, start cooking the onions until they become translucent. Add the garlic and stir for a minute, making sure to spread it without it burning.

Add the beans and stir; let it heat up for a minute or so, then add the rest. Mix well. Add enough cooking liquids to cover the potatoes and simmer. Its done when the potatoes are cooked. Salt and pepper to taste.

Its a simple base, with plenty of possibilities for creative expansion. For one thing, some herbs would change the dish remarkably: a pinch of oregano, some chopped parsley, a touch of rosemary, a little can go a long way. You could add some greens, like frozen or fresh spinach. Sauteing some quartered button mushrooms would add other textural dimensions, as would a handful of corn or green peas. Trade the fresh tomato for sun-dried tomatoes in oil and you're bringing in a different beast into the mix. Even something as simple as a dozen good olives would add great flavors at a low cost.

The cooking liquid could be plain water if you're broke, or you could toss in some beer or wine. A good stock wouldn't hurt either, even if its just a small amount; the cooking process will concentrate the flavors to your advantage.

As you can see, this is something that can be put together in about ten minutes and feed a few people on little more than the price of a happy meal. Very little accompaniment are required, but if you wanted to make it interesting, a nice green salad and a fresh roll with some butter would sate your hunger without draining you too much. Once again, this a single pot dish that can easily be turned into lunches, and that can be served hot or room temperature, summer to winter.

Try it and tell me what you think!

Monday, January 24, 2011

Getting lost both ways

The proud backbone of cookery is to be able to turn something that would be considered wasted at first glance into something not only edible, but delicious. One way this came about involves familiarity with the various preservation methods, and applying those techniques to other non-preserved food items.

For example, take dried foods. This is a preservation method that may well have come about from the need to consume things that had gone dry. Their moisture being gone, it became necessary to put it back so that the softer and more fragile palates (like infants and the elderly) could eat them without breaking their teeth.

I will in later posts deal more with dried foods, but for now, I'll deal mostly with a practical application of otherwise "wasted" food, stale bread.


Bread is such an ancient staple of human life that it is often referred to as "the staff of life." It is a common tread across most cultures, from the nomadic to the most civilized. There are archaeological evidence of primitive bread making dating back thirty thousand years, with more definite evidence turning up with the rise of civilization with the spread of agriculture and grain harvesting about ten thousand years ago. The varieties are mind boggling: Germany is considered to be the top bread culture, with up to five hundred types of basic breads, with one thousand rolls and pastries! Them Krauts sure know their dough.

But what we need to consider is how to make use of bread that's just a little too old to be eaten as-is. If you need to make your bread last, chances are that you're keeping it in the fridge. While this may prevent the growth of molds, it does speed up the staling process (which has nothing to do with moisture evaporation is is more a chemical process involving the starches), which makes the bread a little less enticing. For all intents and purpose, I am using actual bread loaves, not sliced bread; its not that you cant use sliced bread, its just not that great of a base to work with. It is also produced in such a way that the staling process is already slower so that its less likely to be used that way.

So what are we going to do with that stale bread, huh? We're going to learn an old technique that the French call pain perdu that you may know more readily as French toast or bread pudding.


First off, the basic components: stale bread, eggs and milk. That's your basics, regardless of how you want the result to turn out. If you have ethical or health issues with dairy products, it is possible to substitute the milk and egg mix with soy or other milk replacement and some appropriate type of starch, like arrowroot, agar-agar, or corn starch. There is also the possibility of using a mixture of soft and firm tofu, but for the vegans out there, you're on your own to experiment, as I am unable to process soy like others are unable to process lactose. Good hunting!

So what is this two-way thing? We're going to understand the basic technique and look at making it both a sweet and savory preparation. Once that you understand the principle you'll be able to easily play with your ingredients and come up with your own signature variations.

To begin, you need to portion the bread. Whether you cut it in cubes, leave it in slices, or just chunk it up with your bare hands is entirely up to you. Many more refined instructions ask for the removal or the crust, which I never do, as I don't like waste and the crust is the most flavorful part of the bread. In a separate container crack a few eggs and whip them up, to blend white and yolk as much as possible. Pour milk over the bread to soak it up; don't put too much, or the custard is going to take longer to cook. Stir it up once in a while, to make sure that all the bread is nice and wet. Add the eggs and stir it a few times, to spread the mixture all over. There should be some liquid visible, but not so much that your bread is floating in it.

And that's your base right there. You want to make it sweet? There are a variety of ways to do that. You could pour some jam into it: toss in a few handful of raisins and some brown sugar; pour honey, a bit of cinnamon and some nuts; you could even just use sweet pastries or raisin bread. You could also mix it up, combining bread and cake that isn't drowned in icing. Its a pretty flexible platform there.


For the savory angle, you can simply blend in some herbs and spices, if you have them lying around and you're short on supplies. If you add in some vegetables, you need to chop them small and saute them first. A mix of onion and mushrooms could make things interesting indeed. You'll want to stay away from root veges here, as they would not add all that much to the preparation, but feel free to experiment. Another approach could well involve cured meats, such as sausage, ham or bacon (or a combination of awesomeness!); once again, make sure that the meats that are raw, like bacon and sausage are cooked previous to being added in. Non-cooking flavor agents like olives and sun-dried tomatoes are and easy add-on, with a bit of herbs and a touch of olive oil.


Once you've got the mix ready, pour into a baking dish that has been greased to prevent everything sticking to it. This is a great way to make use of your roasting pan there. Personally, I have done the lazy thing and just stuck the mixing bowl (which is oven-proof) straight into the oven for baking. The oven should be preheated at 350f; once you stick your pan in, cook until done. Use a skewer (or a knife) to stick into the center; its done when it comes out fairly clean. Let cool, portion and serve.

The great thing about this technique is that its incredibly flexible and actually pretty fast to prepare. I used to get that going in the morning before going to work. You don't need big fancy gadgets and you can even cook this in your toaster oven if you're making a small preparation.

Prepared ahead of time is large enough quantity and you have either lunches or breakfast for the whole week. Its easy to scale up or down, and will make use of things that would have gone to waste otherwise and that you most likely have lying around already.

Bread pudding: simple can easily be delicious!

Friday, January 21, 2011

A meal for all seasons

Of all the tricks in a cook's repertoire, one thing that has to be developed is a handful of meals that are easy to assemble, cost little and are flexible to allow for variety of whim and supplies. Particularly useful is the dish that uses pantry staples and leftovers. And it has to be so be so easy to do that you can pull it out of your hat even if you're tired and too broke to afford takeout.

One of my stand-byes is a dish I got from my mom called fricassee. According to the webs, a fricassee is a dish made up of white meat, which is stewed in a thick sauce, sometimes with vegetables. There are numerous variations, but mine is one of those blue-collar low-income heart-warmer that anybody can dish out with a minimum of fuss in a very short time, and it requires a single cooking vessel, so the cleanup is minimal as well.


So what is my version of fricassee then? Well, for one thing it starts with leftover meat, and that's the beauty of it. It could be chicken, turkey, pork or beef, it could have been roasted or braised, you can mix it up, depending on what you've got on hand. You could also easily stretch it by adding a sausage, fresh or cured (quartered and diced), thick chunks of bacon or ham, or a simple can of beans.

Add to this an onion, quartered and sliced. The last necessary solid ingredient is your roots: rutabaga, potato, carrots, parsnips, yam even. You want twice as much of those as you have meat. Besides your cooking liquid, that's it. You don't really need more stuff besides a bit of flavoring: salt, pepper, some herbs if you have any. I'd definitely add some chopped garlic, as much as you can stand.

Start by sweating the onion in a bit of cooking fat at medium-low in a pot or pan that's going to be large enough to contain the lot. When then onion gets translucent add the coarsely chopped meat (bite size) and warm up. Add the garlic and stir for half a minute, just enough to spread the love without burning it. Add the vegetables and cover with cooking liquid. Raise the heat and bring to a boil, then reduce to a simmer and cook until the roots are cooked and there's just a little bit of liquid for a touch of sauce. Serve and enjoy!

As you can see, this is basic enough that it can easily be scaled according to the number of guests. Just tossing a can of beans will probably double the amount of proteins. You can spruce up the vegetable intake by tossing in a few handfuls of frozen peas or corn, or you could add some button mushrooms. If you have a piece of tomato that needs to be used, or there's one that on the bruised side of things, just clean, chop up and toss in.

As for the cooking liquid, you could well use just water. But if you have stock, then by all means use it. You could add a spoonful of the powdered stuff, or a bouillon cube. Or you could pour in a beer and top it up with water. The liquid you'll use will add to the flavors and can help compensate for the lack of spices, and you now have a use for that beer leftover that went flat! Same thing with that leftover wine that's been left on the table for a few days too long.

Once prepared this is a dish that will be easy to portion and freeze, a useful thing to have kicking around in your freezer when you need a quick and easy lunch. If you really need some side dish, especially in the summer, all I'd add to that is a green salad. Keep it simple, but make the simple extraordinary!

Kitchen basics: the chopping block


Food nerds, such as I am, can get a little obsessive about their tools; walking into a kitchen supply store is pretty much like a kid walking into a toy store. Going to a department store or any other place that sells kitchen supplies becomes an exercise in geekitude, as we are unable to look at, handle and assess (mostly by snorting in contempt) the wares available. That does not stop us from buying some of them, mostly at liquidation stores (like Homesense) because you do end up finding good deals.

You do also end up, like me, with a drawer full of knives, but that's a question of addiction, more than cookery, and that's for another blog.

Once that you've picked up some dependable knives, you need a cutting surface to use them on. Sure, you could work straight on the counter top, if you didn't care about the damage you'd cause to it, or on a plate, if you don't mind messing up your knives; there are times when you don't feel like taking out the boards and you just really want a piece of cheese, and that's okay. Just don't make it a habit and start butchering chickens straight on the cheap melamine counter top; if anything, you'd be less likely to get your security deposit back when you move out.


Cutting boards come in all sorts of size, shape, material and price, making that choice somewhat trickier than expected. Its easy to get all excited about marble or glass, they look cool and fancy, boosting your ego by looking good; on the other hand, they are about the worse sort of material to use for cutting surfaces. They are very hard, which wear down your knife blades. Its not that they are useless, they do have their purpose, but overall, they should mostly be used as presentation platforms. They will make you look cooler when you have people over and serve the ready-to-eat bites (like sushi) on those cool boards.

The two general materials you want to look for are plastic and wood. There are exclusive proponents to each, and I do prefer wood for most general purposes, but plastic does have its place as well, if only for the convenience of cleaning.

In a way, the board will determine by itself the most efficient use for it: a large heavy board will be better for heavier work, like carving up rutabagas, prepping squashes, breaking bones and other heavy duty labor; a light flexible board is for slicing work, especially if it has to be transferred to a cooking pot afterward; a small board will be useful for small work, like dealing with garlic, slicing cheese, or prepping citrus for your cocktail.


 So, what cutting should you get? Well, first off you'll want something of a middle ground: big enough to handle a full chicken, but small enough to drag out for cutting cheese or citrus. You'll probably want something with a grove all along the edge on one side; this is to catch the juices from either meats or produce. It should be heavy and solid enough to not crack or move around too much when handling serious chopping duty, but light enough that you can lift it one handed when you need to transfer the cut bits to the cooking pot. Whether its wood or plastic I'll leave it up to you and your own preferences; you have to take into account the ease of cleaning and durability, for that plastic does come out on top. I'm just a wood man, that's my style.

Once that you've got a basic board and you feel that its time to maybe diversify a little, you'll want to look at three boards:


a thick, solid butcher's block


a small but handy board for small or detailed work


and a thin flexible sheet for all that chopping that needs to be moved around.

While the butcher's block should definitely be wood, and the small board is ambivalent on its material composition, the thin boards are made from plastic. They are very convenient as they can be rolled, which allows them to be stored in your tool jar, and cheap enough to be easily replaceable if they crack. I used to get mine at the local dollar store chain and they came in pairs.

To wrap this up, some advice:

-as much as possible, clean your board (and knives) when you're done using them. This is especially true if you cut meat or acidic produce like citrus or tomato. The easiest thing to have on hand is a spritzer with a bleach-water mix in the proportion of one-to-ten. When you're done with the meat, spray the surface; this will kill the surface bacteria that could cause contamination.

-Lay down either a kitchen towel or a piece of kitchen drawer liner under the board.


This will prevent the board from sliding around when you're doing the chopping work with your sharp blades. Besides the friction between the board and the counter, it helps dealing with the possible fats and juices from your chopping victims from needing a bigger mop-up than necessary.

Tuesday, January 11, 2011

Food porn

As a bit of a teaser (and because I've been using nothing but external sources for the pictures) here's a selection of the sort of dishes I come up with in my messed up kitchen with more madness than money.

Slow cooked turkey (drumsticks, thighs and the one wing), with a homemade chili rub. First you cook it slow at 300 f, with a glass of water in and covered with tin foil, till the meat is pulling from the bones; then you finish it under the broiler for that nice crunchy finish.  
Do you know the mussel man?  
The fine art of affinage: firm goat cheese marinated in red wine.
Roasted bone marrow; this was the third time I brought home some bones, but the first time I actually did roast them. Its such a simple thing do do really, and fast too. 

Hungry yet?

Over easy


One of the thrifty eater's best friends is the good old-fashioned egg. It's also a good reliable friend to the vegetarian, a quick source of proteins and vitamins that can be prepared in a number of ways, ahead of time or on the spot.

Its a multitasking hard worker, is rather on the inexpensive side of budgetary concerns and is an important binding agent not only in many baking and pastry preparation, but also in many meat and vegetable dishes. You cant really do batter without it and they serves as the glue that hold meatballs and meatloaves together. You pretty much need a few if you ever plan on making your own pasta from scratch, and for the protein-shake enthusiasts, they can help stretch that protein powder by trading some of it for a raw egg before shaking.

Montreal`s Jean-Talon market, my old haunts.
One thing to take into account when buying eggs is that fresh is good. Do a bit of research and see if you have access to a farmer's market.

They may not be cheaper, but they are more dependable for the ethically concerned. Look into the possibility of buying more than a dozen at a time; most farmers will sell their eggs by the carton, at a better price per unit than by the dozen, a useful tip especially when communal purchasing.

You might also want to look at other eggs than just chicken. Depending on your resources, you might be able to score duck, quail or even turkey eggs. Overall for most of your purposes you'll want to stick to chicken eggs. They are more versatile, they have a greater variety of size and they are available pretty much anywhere, even at some convenience stores. Other fowls tend to produce eggs that have a larger yolk, which need some getting used to before preparing. For most purposes, stick to large eggs; they are the most common and most recipes are tuned to that particular size. That way you'll avoid  the equivalency math.

To begin, the soft boil egg. Its a pretty basic deal, something most of us were exposed to as children. For our purpose I'm going to show how to prepare a firm egg, not one of those softies with the gooey yolk. They are good, but somewhat less versatile, so they come serve our purpose. For this you'll need very little: eggs, a pot and enough water to cover the eggs. The only thing you could add to this basic preparation is a pinch of salt in the water, which helps to ready the shell for cracking.
 

Put the eggs in the pot, cover with water (and a pinch of salt if you want) and bring to a boil. As soon as the water is boiling, turn off the heat and let stand, covered for twelve minutes. After the time has passed, drain and quick chill by putting them in a bowl containing iced water and ice cubes. This prevents the formation of that green sheen on the yolk caused by phosphorus. The green stuff isn't bad, its just not as appetizing. Let sit five to ten minutes. Crack the shell, roll the eggs and shell off. Enjoy!.

Preparing a few eggs this way and keeping them in the fridge ensures that you have a ready supply of ready-to-eat proteins at hand. Just make sure that you don't shell them until you're ready to eat them. At most a sprinkle of salt and pepper are enough to enjoy the little guy. Another use for those soft boils is to quarter them and serve them as topping in your Ramen soup with some chopped green onion.


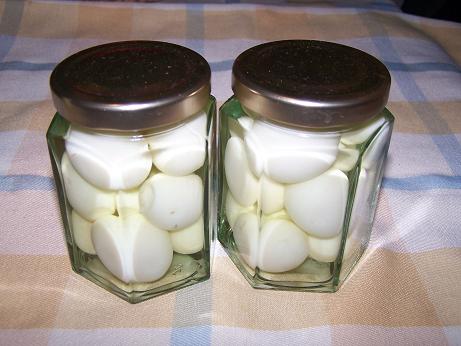
As a second preparation, you can keep a jar of pickled eggs in the fridge. For that purpose, I would recommend that you get eggs that are referred to as peewee, the smallest chicken eggs of the lot. Its better for you to get them straight from the farmer's stall, in carton size. They are very cheap; locally, I can get a carton, which is two and a half dozen, for a couple of dollars.
 

To prepare the pickling, choose the jar that will hold them. For that purpose I use a big jar that used to house pickled Gherkins. Carefully fill the jar with with the eggs, keeping a count. Make sure that you leave some space at the top so that there will be enough liquid to cover them. Then, keeping the eggs inside, fill the jar with water, covering the eggs. Pour out in a measuring cup; you now know the number of eggs you'll need to soft boil and the amount of brine you'll need marinate them.
 

Begin by soft boiling the eggs, cooling, shelling and setting them aside. For the brine, calculate that the liquid proportions are one portion water to three portion of white vinegar. Pour into a pot and add your flavoring agents: black peppercorns, whole cloves, two spoonfuls of salt, a couple of slices of fresh ginger and a bay leaf. Bring to a boil and keep boiling for ten minutes.

Put all the boiled eggs in the jar and pour the brine on top, using a sieve to remove the flavoring agents. Seal and keep in the fridge. Let it marinate for at least a couple of days before eating, but the longer the better. You are not absolutely obligated to separate the spices from the brine. You could very well let the peppercorn and ginger in, and if you have it on hand, drop a sprig of fresh rosemary in the jar. Just hit it a couple of times with the back of your chef knife to help release the essential oils.


This pretty much the French Canadian flavor; do some research and you'll find other variant depending on your taste and uses. Some involve beet juices or hot peppers, its all up to you at that point.

And now, something hot and quick to prepare!


A frittata is the omelet's more rugged cousin. It is a meal unto itself, and the eggs in this preparation serve as a binder to all the other goodness that are added in. For this preparation you'll need some sliced vegetables: onion, zucchini, bell pepper and/or mushrooms.
 

Start by warming up some oil and slowly cook the onion slices unto they soften up. Add the other vegetables and cook until soft, stirring to prevent them burning.once that they have softened to your liking set aside. Crack some eggs in a bowl (about two eggs per person) and whip with a fork or a whisk if you have one. Season with a pinch of salt, some ground black pepper and pinch of herbs (chives, oregano, basil) if you have any at hand. Still stirring, pour the egg mixture in the pan. Stir the mix in a circular pattern, scrapping the forming crust for about a minute, which help add some airiness in the mix. When you have a crust firming up at the bottom pour in the vegetables and let cook. You can cover it to help speed up the process, but keep an eye on it to make sure that you don't overcook it.

When the mixture is getting mostly cooked, with just a bit of liquid left on the top, you can add a few scraps of cheese to the top and stick under the broiler. Make sure that the grill is as high as possible in the oven and that the pan handle can stand the heat. Its done when the top beings to brown. Plate and serve with a slice of good bread and some good olives if you desire and have them at hand.


To this you can vary by adding some spinach, either fresh or frozen; a clove of garlic, crushed; a chopped tomato. If you have some meat you can always add some chopped bacon, shredded chicken, sliced sausage, or a handful of shelled prawns. Its really a matter of using what you have. Just make sure that the meat is already cooked, and that if you're using seafood that it is cooked sufficiently; you really don't want to deal with the risks associated with unproperly cooked seafood.

Tuesday, January 4, 2011

Kitchen basics: pots and pans

That's sort of what my cupboards are filled with...


 Cooking is the art of applying heat to food to make it edible. Sure, you could always eat your meat of fish raw, but you need a lot of skill, knowledge and cash to do that in a safe way; sushi chefs train for years, and both their raw fish and the meats used for carpaccio, ceviche and tartare require a serious down payment, as we are talking prety much the top end stuff.

So to apply heat to food, you need pots and pans. To these I will add a couple of roasting racks, you'll see why later.

So, just what basics do you need exactly? In my opinion, three.

First off, you need a frying pan. It has to be large enough to make a stir fry in, but small enough that you can use it to fry an egg or make an omelet. You'll want something that has some weight to it, but s light enough for you to hold one-handed. And finally, you'll want something made out of stainless steel, preferably with a thick bottom. You could go with a non-stick surface, but it wont last as long and you'll need some specific tools so that you don't scratch the Teflon and put that stuff in your food. The steel ones are going to last a lot longer too, so you're thinking long-term here.
This is a pretty good choice, a whole steel body, which is important when you stick this in the oven, and it comes with a lid, so that braising and even stewing is possible.

As for pots, you need two, one small and one large.


Two is the necessary basics, and for that, just consider pasta: you need a pot to cook or warm up the sauce, while you need another to cook the pasta. You could just use one, but if you want to save time, you do both together. Size-wise, you need a sauce pan that is small enough that you can use it to boil eggs, but large enough to cook a meal in. The large pot has to be pretty big: you need something that will allow you to cook large batches, like stock; you want something that will be able to fit a normal sized chicken and be covered with water.

Once again, stainless steel should be you material of choice. None of that non-stick finish, and try to get full-metal working, so that you can use them to cook in the oven. If you can arrange it, get copper bottom pots, either with just the outer layer, or sandwiched in the steel. They are much more efficient, as copper conducts heat faster, requiring less warming up time. They are somewhat heavier, but fully worth it. If you have copper bottom pots use a bit of lemon juice to clean it, it does the job much better than steel wool.

And finally, some roasting pans.
This allows the efficient cooking of large pieces of meat, whether traditional roasts, chicken, or ribs, but does wonders to roast vegetables, bake casseroles or lasagna. If you can, get one with a reversible grill, so that you can have it at different heights; that way, you can roast your meat and vegetables at the same time, and the dripping juices will flavor the vegs. Again, avoid non-stick coating, that way you'll save on the other kitchen tools you'll need.

You cant really go wrong with a cookie sheet or two, depending on whether you plan on doing some baking; if nothing else, it avoids you taking out the roasting behemoth to warm up your food. Another possibility is the glass of ceramic baking dish.
You can use them for roasting and baking, but they really come in useful if you want to make stuff like mac-and-cheese, lasagna, bread puddings and other sort of baked goods. They are pretty tolerant to heavy usage, but they are heavy. Not a top priority, as you can do without, but if you can get one free from aunt Gertrude, take it.

Next posting, we'll look at cutting surfaces.

*Thrifter's tips: this is not a be-all-end-all of cooking dishes, its really just a base to get you started. There's a good chance that you'll end up with other items, hopefully in good condition. Don't turn them down unless you're running out of space. If anything, you can use them in trades with other needy friends. Second hand places can be a treasure trove of good tools, and it doesn't hurt to keep some extra on hand, just in case. If anything, it'll save you having to do some dishes when you need to eat ASAP.*

Intermezzo

The current ethical thinking in food circles is sustainable diet. Lets be honest, the whole locavore thing (like eating stuff produced within one hundred miles) looks very nice if you're in California, but is a bit more difficult if you're in Detroit. Its not impossible, but when you have a tight budget, no car and possibly no job, your income is a bit tight.

But not impossible. Mark Bittman, a columnist for the New York Times and a sustainable diet proponent, recently posted this column in the NYT about basic dishes one should master that require little time/attention, and works with a minimum selection of supplies.

Since that he also has a Youtube channel, expect him (and others) to make semi-regular appearances on the blog.

Sunday, January 2, 2011

Pizza for pennies

One sure way to make something delicious with tidbits from the fridge is to cobble up some pizza. Its really a no-brainer, as the original idea was to make use of leftovers and unused bits of this or that that were lying around in the kichen.

For this post, I'll go through the three basic elements that make a basic pizza, that is: the dough, the sauce and the toppings. On that basis, its pretty similar to the breakdown of a Ramen soup, just on a somewhat higher budget, if a quarter can really make a difference on he overall dish.

The dough, or bread forms the basis of the pizza, the structure on which the whole dish is based. You can have awesome toppings, but if the dough is screwed up, you'll end up with a mess. If you want to make it quick and easy, just use some flat bread. Pita bread is the easy choice, with different results whether you use the traditional thin Arab version
or Greek style
 The difference is that the Greek bread is designed to be both flat and fairly thick, while the Arab
version is thin and puffy. If you like thin crust then go for the Arab one, which will cook faster, but if you over cook them they'll be quick to break apart as you eat them.

Having found a good platform on which to build our dish, its time to think of the sauce. The sauce is there to provide a base of flavorful moisture to the bread base. With a good enough bread and sauce, you could very well forgo the cheese and just make it a meal after setting it to warm up in the oven.

There are two general branches for sauces on a pizza: tomato and oil based: 

-the tomato sauce is the definite Italian signature, with many variants depending on the region, and nona's secret recipe. If you want something really quick and no fuss, just use a few spoonfuls of premade pasta sauce. Just made sure that you're not going to waste it just because you wanted some pizza real quick. Depending on what you've got on hand you can also simply use bruscheta topping, if you like that extra hit of fresh tomato and garlic.

If you feel like making your own sauce, you can use this simple recipe: thinly slice half an onion which you soften up in a pan set at medium-low in enough olive oil to keep it moist. Sprinkle a pinch of salt on the onions to help them sweat; when they go soft and translucent add as much crushed or sliced garlic as you want. Just be sure to cook the garlic just enough to soften it and not burn it. Add the equivalent of one or two chopped tomatoes, whether fresh or prediced in can; in that case make sure to add a little bit of the juices to make sure that your sauce is moist enough. Season with some ground black pepper, basic and oregano.

-the oil based sauce is quite French in origin. While using pesto does wonders, you can well just finely chop up some fresh herbs a bit of garlic and blend it with some good olive oil and brush your bread with it. If you have the time, you can use poached onions, which the natives of southern France use in their version of pizza, called pissaladiere.


Finely slice one of two onions split in half. Slowly cook them in plenty of olive oil (they have to swim in it) with a few pinches of salt over low heat for forty-five minutes, or until they have sweetened and softened up. You can add some crushed garlic and a touch of balsamic vinegar, depending on your tastes or inclinations.

Bread and sauce dealt with, its topping time.

The primary topping is cheese. If you just put cheese on, you could just cook it and call it a day. As a matter of fact, that is pretty much the original version, if you add garlic, fresh basil or oregano. We are used to thinking that mozzarella is the most important and only cheese to use on pizza, but mozzarella has one major flaw, it has no flavor. It serves primarily as a bonding agent between the bread and the toppings, making sure that everything stays on board.

The cheese you'll use will mostly have to do with what you have on hand and what toppings you will use. I find that its a convenient way to use all those bits and pieces of cheese that are lying about going dry or getting a little shifty. You don't need to put massive amounts of it, just enough to cover the sauce and allow the other toppings to bond.

As for the rest of the toppings, its pretty much like the cheese, use what you've got on hand: slices of tomato, zucchini, sliced mushroom, bell pepper, pulled meats, cured meats, deli bits of goodness, anchovies, capers, its all up to you. You can overload it, just like you can just sprinkle it on top. If you have some dry cheese, like parmigiano or a bit of dried up cheddar, grate that finely on top, maybe a pinch of oregano and drizzle of olive oil.

Once that you have the beast assembled, toast in the oven till cooked to your liking. The fun thing about pizza is that its pretty easy to scale it to your needs or to your tastes. If you just need to whip yourself up some quick lunch for work or school, then a quick spoonful of pasta sauce on a pita bread, a handful of shredded cheese on top, with maybe some fresh herbs, or bits of salad, or some leftover Chinese, or some pulled meats, or some deli slice... by the time you're out of the shower your lunch is cooled down enough to quickly pack it and you're out of the door.

And all that you really need is a toaster oven and a few staples.

Saturday, January 1, 2011

Safety in numbers

In this post, I will expose the two basic ways that you can use to expand your food stock while maintaining a tight budget: bulking up and communal effort.

Bulking up

One way where we will generally mess up our budget is by the portioning of food; what I mean by that is that we tend to buy items based on individual price for immediate need, rather than volume price for multiple uses. A simple example of that is rice. While we may think that buying a small bag, say one pound fits in this week's budget better, buying a five or ten pound bag, while more expensive on the individual purchase, actually brings more return on the long term because you will get a greater quantity for the price. The larger the item, the cheaper per weight.

Its simple economics really: if you have one hundred pounds of rice to sell, you'll be spending more effort and resources portioning it in one hundred packages of one pound each than in ten packages of ten pounds each. The smaller packages tend to also move at a slower rate, which means that the expenses of keeping it in store is higher.

Another important and clear example is with meat: the smaller and more specific the piece of meat, the higher the price per weight. Next time that you're in a grocery store, head to the meat section and look at the price per pound of chicken: look at the price of drum sticks, breast steaks, wings, and then look at the price of a whole chicken. Sure, you are alone and very few people can eat a whole chicken in one sitting, but when you've learned how to deal with the bugger, you'll pretty much stop buying your birds in parts and just deal with the whole beast at home.

I'm not saying that you'll do the same thing with pork and beef, but something similar will happen. The idea here is that you'll realize that the price of the food item has to do with the amount of work that others have put into it. You can save lots of money by doing the work yourself, and you'll look really awesome to your guests when you can serve feasts of flavor and plenty on a tight budget.

Communal effort

 Chances are, you have friends. And chances are that your friends are in the same sort of financial bind as you are. That's just how society works, we tend to associate with people who are at a similar social status, especially when it comes to finances. People who have money don't tend to friend and associate with people who don't, so if you don't have loads of cash your best bet is to stick together. As the saying goes, united we stand, divided we fall.

Now, in all disclosure, I'm something of an anarchist in my approach to life's problems. While I am quite inclined to solve problems on my own (the joys of self-reliance), I do also have to accept that there are times when the best solution is to team up and pool efforts and resources for greater total results.

When you get right down to it, we all have our little specialties, either out of interests, inclinations or inborn talent. Its like a sports team or a military unit. You don't build a team out of multitasking supermen, you build a team out of resourceful individuals who are very good at some specialized tasks, which talent is put to the service of the whole group. A kitchen also works on the same principle: everyone thinks that being a chef is what it's all about, but the chef is something more of a team leader and manager. Under his direction is a whole crew of specialists who can execute their tasks so that the whole kitchen is as effective as possible while achieving the best results. Its a misunderstanding to think that the chef is solely responsible for the great dish: your meal is the result of the entire kitchen staff's combined effort.

When you deal with home cooking on a tight budget, and you want to maximize that budget by bulking up, the larger bulk item are far too much for a single household. However, if it is split amongst, say four houses, then everybody saves money. By pooling your kitchen know-how, everybody also benefits from those pooled skills and a single afternoon allows everybody to take home not four dishes each, as you would on your own, but possibly up to sixteen dishes. And all of that on a smarter budget.

When you get right down to it, four people shopping together can not only pool their budget money to maximize the amount of food, but they can spread those interesting preparations amongst friends, improving the variety of your weekly fare, but by all shopping together, they save money on gas as everybody share the same vehicle. The larger bulk items, like those eighty pounds bag of rice, at about forty bucks make the rice per pound at fifty cents. And by sharing the vehicle, it is now possible to bring that heavy bastard home, something which you might not be able to do on your own.

One thing that can be tricky when cooking for yourself is that most recipes as portioned for four, six, eight, even twenty people sometimes, so adjusting those preparations to one or two is a bit of an obstacle. Preparing in advance and learning how to preserve that food is one way to deal with that problem; but taking this same recipe and multiplying it, doubling the outcome allows you to save because you'll be buying larger amounts that are cheaper to the pound. You'll also be maximizing your output because while on your own you'd need to do four different meat dishes and that would be it, by teaming up you'd get those dishes, AND cookies, AND bread, AND soups, AND an increased variety of dishes, all with about the same amount of effort and time.

That looks like something of a WIN in my book!

Second lesson

The second lesson, and it bears repeating and will come back a lot throughout the blog is, more bang for your bucks. Its pretty obvious that we want to most for the least, but its not quite as obvious to know how to get there.

Essentially, the one inescapable constant is that we have a limited budget. So the game is to learn to be as efficient as possible with that budget. That means that more than likely there will be sacrifices to be made. Some items, which might be considered necessities could well turn out to be actual luxuries, and its also very likely that you'll have to step on your pride about certain things. Better come to terms with that early on, deal with it and move on.

The trade off of sacrificing certain foodstuffs is that you'll learn to make not just do with what you have, but to make it so delicious that neither you nor your fellow dinners really miss those previously cherished items. Its not that they will be forever banned from your diet, but its that they will be all the more cherished because they will now become special occasion treats.

You'll have to bone up, both on your knowledge and skills, expanding your possibilities. Its not so much going to be about "what can I eat" related to a lack of ready-to-eat scarcity, but "what will I eat" based on the range of possibilities based on what you have available on hand and what you can do with it. Once that you've opened your mind to cooking, its amazing the simple dishes that you can make that will satisfy both palate and stomach on a few ingredients, minimal effort and a few dollars.

In the next post, I will demonstrate a couple of useful methods that you can use to expand your pantry without blowing your budget.